~/.Xresources へ記述する.
Emacs.Fontset-0:-*-fixed-medium-r-normal--14-*-*-c-*-*-fontset-defaults,\
    ascii:-monotype-andale mono-medium-r-*-*-14-*-*-*-m-*-iso8859-1,\
    latin-jisx0201:-motoya-cedar1mono-medium-r-*-*-14-*-*-*-m-*-jisx0201.1976-0,\
    katakana-jisx0201:-motoya-cedar1mono-medium-r-*-*-14-*-*-*-m-*-jisx0201.1976-0,\
    japanese-jisx0208:-motoya-cedar1mono-medium-r-*-*-14-*-*-*-m-*-jisx0208.1990-0,\
    japanese-jisx0212:-motoya-cedar1mono-medium-r-*-*-14-*-*-*-m-*-jisx0212.1990-0
Emacs.Font: fontset-defaults
変更後,以下のコマンドを実行し反映させる.
$xrdb-merge~/.Xresources
~/.Xresources へ記述する.
xterm*fontSet: -misc-fixed-medium-r-normal-*-14-*,-misc-fixed-medium-r-normal-*-14-*-iso8859-1
xterm*boldfontset: -misc-fixed-bold-r-normal-*-14-*,-misc-fixed-bold-r-normal-*-14-*-iso8859-1
変更後,以下のコマンドを実行し反映させる.
$xrdb-merge~/.Xresources
gtk+ 1.2 を使うソフト[10] のメニューなど User Interface に関するフォントは, ~/.gtkrc に以下の様に記述する.
style "gtk-default-ja"
{
    fontset = "-monotype-andale mono-medium-r-*-*-12-*-*-*-m-*-iso8859-1,\
    -motoya-cedar1mono-medium-r-*-*-12-*-*-*-m-*-jisx0201.1976-0,\
    -motoya-cedar1mono-medium-r-*-*-12-*-*-*-m-*-jisx0208.1983-0,\
    -motoya-cedar1mono-medium-r-*-*-12-*-*-*-m-*-jisx0208.1990-0,\
    -motoya-cedar1mono-medium-r-*-*-12-*-*-*-m-*-jisx0212.1990-0"
}
widget "*Text" style "gtk-default-ja"
重要なのは fontconfig の設定がうまくいっているかどうかです.
fontconfig のコンフィグファイル /etc/fonts/local.conf[11]
で TrueType フォントがインストールしてあるディレクトリが指定してあるかどうか,また, fc-list で,インストールしてある TrueTypeフォントがリストされるか確認しましょう.リストは UTF-8 で吐き出されるので,フォント名に因っては化けます.
$ fc-list | iconv -f UTF-8 -t EUC-JP | sort
若しくは
$ fc-list | nkf -e | sort
化けて見辛い場合は,上記のように iconv や nkf に pipe すると良いでしょう.
/etc/fonts/local.confはシステム全般での設定ファイル,~/.fonts.confは各ユーザ個別の設定ファイルです.
/etc/fonts/fonts.conf,/etc/fonts/local.conf,~/fonts.conf, は XML[12]で記述され,DTD[13]もfonts.dtdというファイル名で /etc/fontsディレクトリ内にありますから編集は簡単です. emacs の psgml-modeで編集すると楽に編集できるでしょう.
fontconfig でフォントをインストールしたディレクトリが走査されるように指定するには,/etc/fonts/local.conf ,或いは~/.fonts.confへ以下の様に<dir>〜</dir>タグでフォントのあるディレクトリを囲んで追記します.指定されたディレクトリは再帰的に走査され,フォントのリストが作成されます.
<dir>/usr/X11R6/lib/X11/fonts</dir>
<dir>/usr/share/fonts</dir>
<dir>~/.fonts</dir>
フォントサイズによって,また,フォントによってはヒンティングを強く効かせると読み辛くなったり,逆に汚くなったりすることがあるが,それは autohint と hinting によって制御できる.
以下の例では 16pixelより小さいサイズでは autohintを無効にし,16pixel以上では autohintoを有効にしている.
<match target="font">
  <test name="pixelsize" compare="less">
    <double>16</double>
  </test>
  <edit name="hinting" mode="assign">
    <bool>true</bool>
  </edit>
  <edit name="hintstyle" mode="assign">
    <const>hintslight</const>
  </edit>
  <edit name="autohint" mode="assign">
    <bool>false</bool>
  </edit>
</match>

<match target="font">
  <test name="pixelsize" compare="more_eq">
    <double>16</double>
  </test>
  <edit name="hinting" mode="assign">
    <bool>true</bool>
  </edit>
  <edit name="hintstyle" mode="assign">
    <const>hintfull</const>
  </edit>
  <edit name="autohint" mode="assign">
    <bool>true</bool>
  </edit>
</match>
ビルド時に ./configure のオプションで --enable-xft を指定し Xft2 + fontconfig サポートが有効になっている Mozilla は,メニューの Edit → Preference のフォント設定でフォントを選択するだけです.fontconfigが有効なMozillaでは以下のようなフォントリストが表示されます.
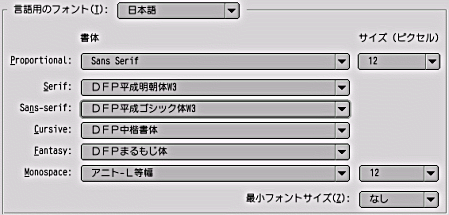
図 5. Xft2 + fontconfigが有効なMozillaでのフォント選択リスト
User Interface 部分のフォント設定は,~/.mozilla/$USER/XXXXXXXX.slt/chrome/userChrome.css に記述します.fc-list で表示されるフォント名で指定しないとならない点に注意が必要です.
以下は私が行なっている設定例です.
@namespace url("http://www.mozilla.org/keymaster/gatekeeper/there.is.only.xul"); /* set default name space to XUL */
* {
  font-size: 12px;
  font-family: "Anito-L-Mono", monospace !important;
}